This article is all about how to use RxSwift with MVVM. RxSwift has been a hot topic in the swift community for a few years now, but somehow I’ve managed to avoid it. It took me a while to switch my brain to the state that everything is an Observable. I also had some trouble at first to figure out when to use Variable, Observable, PublishSubject and how I should bind values to UI components. I'll cover all these topics in this blog. I'll show how to use RxSwift with MVVM, UITableView with RxSwift, how to write a network layer and how to test a RxSwift app. I won't go through the MVVM pattern from the ground up but after you've read the series, you'll be able to use RxSwift with MVVM. In case you want to learn the basics of the MVVM pattern, I suggest that you check out my earlier post MVVM with Swift application.
I’ll cover these topics by showing how to write an application called Friends. You can get the complete source code for the app from GitHub, just check out the RxSwift branch. I wrote the app using MVVM without RxSwift 18 months ago. Now, I thought it would be nice to refactor it and see how it looks like when using RxSwift with MVVM. Friends is an iPhone app that downloads a list of friends and displays them in the app. You can also add, remove and update friends. So it is a simple app with just enough complexity to cover many of the basic needs of an iOS app. It is also a great place to start learning how to use RxSwift with MVVM! Btw, the backend is written in swift using Vapor!
In this first part of the app, I’ll show the basics of using RxSwift with MVVM. Setting up correct CocoaPods. Binding data between the ViewModel and the view. Using UITableView, showing a loading indicator and how to displaying an error to the user. We'll first go through the ViewModel side of the implementation and then the view.
Start using RxSwift with MVVM pattern
At first, we need to add RxSwift to the project. In this example, we’ll use CocoaPods but you can also use Carthage and Swift Package Manager. Check the GitHub repo for more info.
In the pod file, you’ll need to add:

RxSwift adds the basic library including Observable, Variable, PublishSubject etc. RxDataSources includes UITableView & UICollectionView related reactive libraries. RxSwiftExt helps with binding the observables straight to the UI-Components.
We’ll also add all the libs for the testing targets that we have. And after we are done editing the Podfile, we’ll need to run pod install in the terminal.
In the first part of how to use RxSwift with MVVM, we’ll be concentrating on the first view of the app:
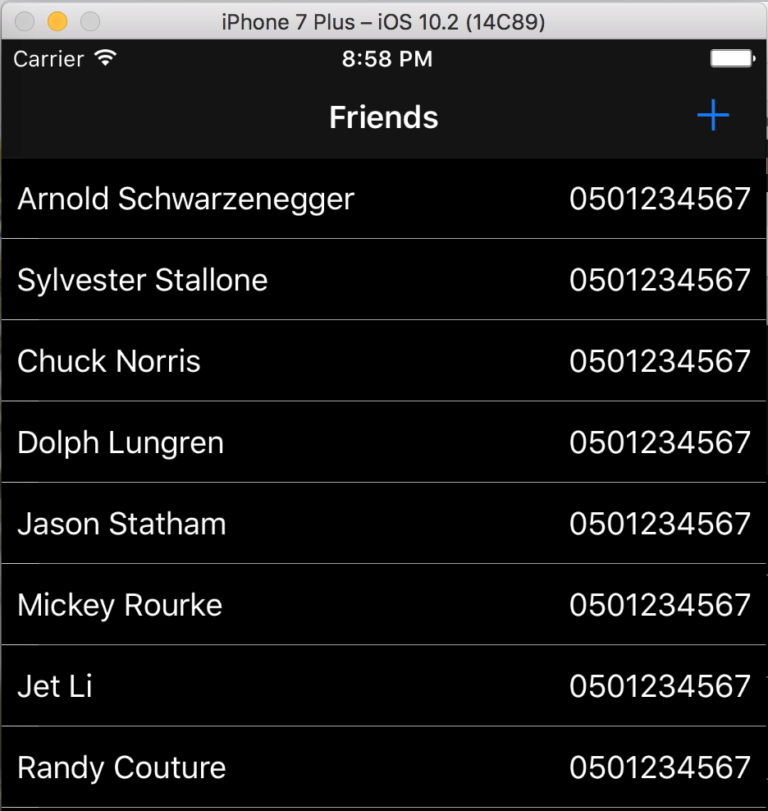
The first view has a table view that shows all items loaded from the backend. To present all this, we’ll dive in to FriendTableViewViewModel & FriendTableViewController. Let's start with the ViewModel.
How to use RxSwift with MVVM — ViewModel
ViewModel is the module that makes the data ready for the view (which in this case is the FriendTableViewController). ViewModel is also the place where we put most of the business logic. I say ‘most’ since we should try to avoid a situation where the ViewModel turns into just another place where we dump all our code. You might have heard about the MassiveViewController problem, and we don’t want to end up with a MassiveViewModel either. So if something can be refactored to its own module, we should always try to do that. But I am sure that you are eager to take a look at the code, so let’s check it out!
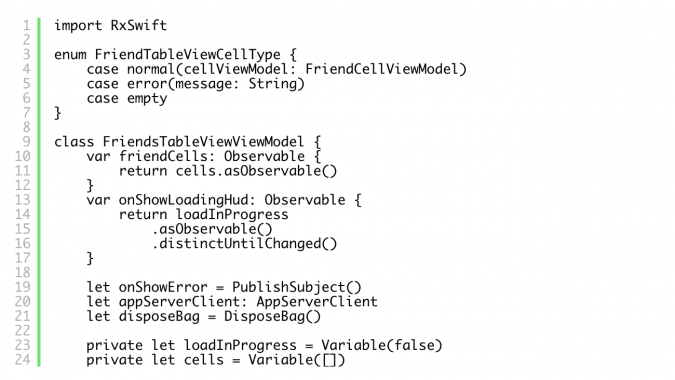
At first, we’ll import RxSwift so that we have the tools provided by the library available for use. Right under the import statement, there is an enum FriendTableViewCellType. This enum contains all the cell types our table view can show. The types are normal cell, error and empty cell. Normal cell presents the data for a friend. Error cell shows error information to the user and empty cell is shown when there is no data on the server. We'll check how to use them more specifically in the view controller codes, but for now, this is all we need to know.
Variables & Observables
Then we can start with the RxSwift stuff! At the bottom of the code block, you can see two variables that are defined as Variable. Variable is a type provided by RxSwift. It is the simplest type to use, so it's a good place to start observing the RxSwift observables. Observables in RxSwift change their state by emitting onNext, onError, andonCompletedevents. However, with Variable, you use the value property to set up a new value. When we want to subscribe to a Variable, we need to use the asObservable() function. After all that is set up and whenever the value is changed, the observer is notified. Furthermore, Variable is guaranteed not to emit error so it makes things a bit simpler to handle on the view controller side.
Here we have defined loadInProgress, cells as Variables. Cells contains the cellViewModels, which are used when constructing the cells. The value for the array is created every time a valid response containing friend data is received from the server, and the value only changes when a new request to the server is initiated. The cells is a private member so that the cell value can only be changed by the ViewModel. This way there is no chance that the value is accidentally changed on the view controller side. As a pair for the private cells variable, we have a friendCells Observable. It is a computed property and it returns an observable for the cells variable. This is the variable that we'll use later on the view controller side to bind the cell value to the tableView.
The loadInProgress variable is used whenever this class is performing a network request. It is also defined as private, just as the cells variable we discussed above. loadInProgress also has a public computed property onShowLoadingHud. It is defined as an Observable and it returns the loadInProgress as observable. This is the variable that we'll bind to on the view controller side to present the loading hud. Notice the distinctUntilChanged which means that the value is only emitted if it is changed.
PublishSubject
Now let’s check the onShowError which is defined as a PublishSubject. PublishSubjectreceives information and then publishes it to the subscriber. Here, the subject that is received is defined as SingleButtonAlert and that is also what it will publish to the receiver. The value is emitted the same way as with all observables, using the onNext() function. So using PublishSubjectis very similar to using variables, but instead of setting the value, we’ll call onNext() instead. I think we could have also used simple Variablewith onShowError, but I wanted to use PublishSubject to cover a bit more types from RxSwift.
SingleButtonAlert is a type that defines a title, a message and a button title with an action to present an alert type to the user. The code is pretty self-explanatory and you can check the class here.
The last two members here are appServerClient and disposeBag. AppServerClient is a component which does all the requests to the server. All the codes are available, but I'll dive in to the network layer in another post.
So what is a DisposeBag
The last but one of the most important variables is the DisposeBag. To destroy an Observable, we should always call dispose() to it. It would be very hard work to handle the disposing manually, so RxSwift equips us with the DisposeBag. When creating an Observable you should always add it to disposeBag by calling .disposed(by:) to it. This way when the disposeBag is deallocated, it calls dispose() to all the observables, which takes care of the memory they've used. So inside the view model, we define our own disposeBag. When the view model gets deallocated, all the observables are deallocated as well.
With these simple variables, we can already see that the data binding between the ViewModel and View is very simple! On the view controller side, we’ll only need to subscribe to these variables and data binding is completed. There is no need to use any other data binding techniques (such as Bindable we were using in the 'How to use MVVM' tutorial) or delegation since RxSwift does it all for us! How cool is that! 🙂
Getting friends from the server
As mentioned, we’ll be using AppServerClient for the server requests. Every time a request is sent to AppServerClient, it returns an Observable. Let's see how this looks when we are getting a list of friends from the AppServerClient:
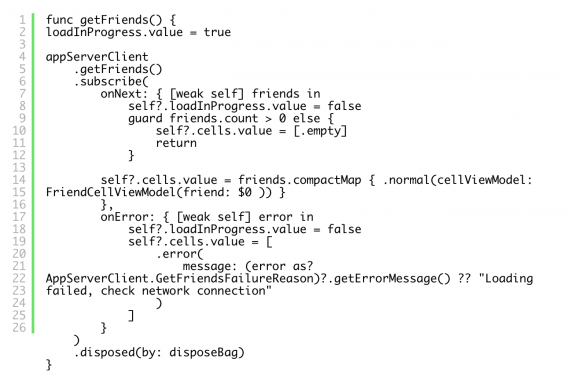
So we have defined a function getFriends(). The first thing to do is to present the loading indicator to the user whenever we are calling this function. This is done by setting the value for loadInProgress variable to true. After that, we'll call getFriends() from the appServerClient and subscribe to the observable it returns. Now, we'll start to listen for the different values it can emit.
When an Observable receives a new value, it sends an event containing the value. We could subscribe to the event, then go through all the states that the event can have and unwrap the value inside the event. But there is an easier way. RxSwift also provides subscribe functions we can use for the different states. So instead of always checking which event was emitted, we can directly define the blocks for different states, as we've done above. The events can be onNext, onError, onCompleted and onDisposed.
Here we don’t need to free any memory when the onCompleted or onDisposedis called, so we only handle the onNext and onError states. Inside the onNext, we'll first set the loadInProgress to false. Then, we'll check that the friends array we received contains items. In case it is empty, we'll set [.empty] cell as the value for the friendCells. If we have a value, we'll use compactMap to convert the friend items to cell view models and set the value for the cells.
Inside the onError, we again hide the loadingHud. Then we'll set the friendCells.value to [.error] and for the message we'll use an extension to convert the provided error value to the correct error message:

The last thing we need to do is to add this observable to the disposeBag so that it gets disposed when the view model is deallocated.
Now we have covered the view model. Let’s move on to the view controller side.
How to use RxSwift with MVVM — ViewController
In the view controller, we’ll use the RxDataSources for the tableView handling and RxSwiftExt for binding the observables directly to the UI-Components. In this part, we'll also concentrate on presenting the loadingHud and errors to the user. We'll also bind the friendCells values to tableView and see how we can delete a friend.
At the beginning of the class, we’ll notice the view model definition. This is where we’ll also create the view model since this is the first view of the application.

In the viewDidLoad, we'll call the preparing functions:

First, we’ll prepare the view model by binding all the values in the bindViewModel(). Then we'll set up cell deleting and tapping. After those function calls, the view is completely setup and we can use the getFriends()function to start downloading the data.
Binding tableView datasource and handling delegation using RxSwift with MVVM
Next, let’s check the bindViewModel() function:
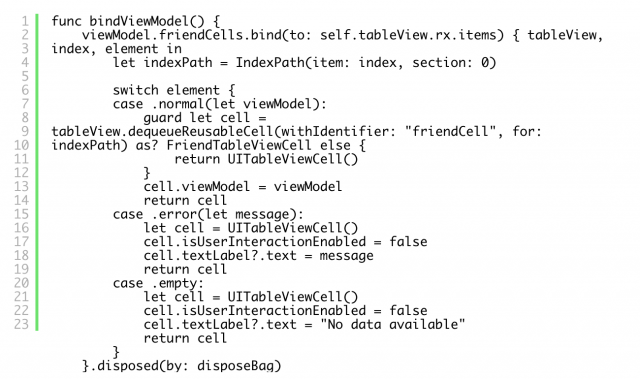
At first, we’ll bind the friendCells to tableView. As you might remember, friendCells is a computed property of cells and it returns the observablefrom the cells variable. After that, we'll call bind(to:) and give the tableView.rx.items as parameter. tableView.rx.items is a binder function working on observable sequence of elements, such as Observable. Binding creates an ObserverType which subscribes it self to the observable friend array. It also sets it self as the dataSource and delegate for the tableView. Whenever a new value is received from the friendCells, tableView reloads its content.
RxSwift calls the closure that we have defined for each item. Here is where we can configure the cells. Element contains the enum value defined on the view model side and index is the index of the element. Since our view only has a single section, we’ll convert the index as indexPath, using section value zero. Then, we’ll use switch to check if the element contains .normal, .erroror .empty cells.
In the normal case, we’ll deque the cell from the tableView and set the viewModel received as the cells viewModel.
In the error case, we’ll create a default UITableViewCell and set the provided error message as the textLabel?.text. In the empty cell's case, we'll do the same as with the error case, with the exception that we'll use hard coded "No data available" as the textLabel?.text.
Now that we have handled the data source and delegation of the tableView, all that is left is to make sure that this observable is disposed of using the disposeBag, when View is deallocated.
So what do you think? When you compare this piece of code to the normal way of setting up a data source and implementing all the tableView delegate functions, which one do you feel is easier?
Now, let’s see how to handle the selection of a cell by checking the cell deleting!
Handling cell deleting
Cell deleting is also handled by a function provided by the rx extension:\
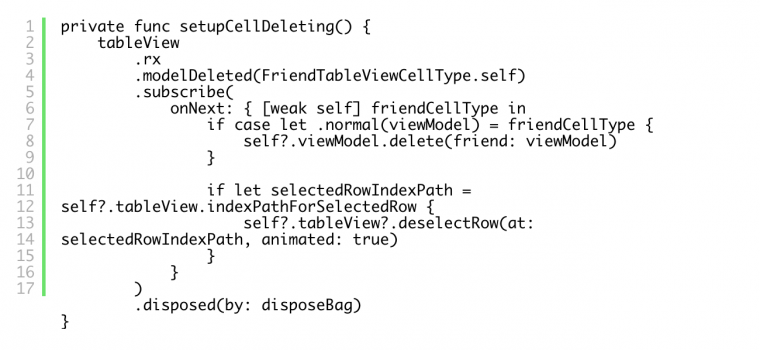
Again, we can access the helper functions for tableView using the .rx. Whenever the delete event gets called for the tableView, also the modelDeleted gets called. So inside the function, we'll just check that the cell type is what we expect, and call the viewModel.delete function with the correct ViewModel as a parameter. Since the friend application updates the cells by reloading the content from the server, we'll also deselect the row here to make the UI work smoothly.
Selecting a cell is done with modelSelected and the handling is very close to cell deleting. I hope you can figure it out by yourself just by looking at the code.
Now the only thing left for us in this part is to present an error and a loading hud! Isn’t that exciting or what? 🙂
Presenting errors and loading hud
In the bindViewModel(), we also start observing when to present a loading hud and, if needed, an error note. We could do it in the same way as when we were listening to the observable states when receiving friends from the network client. But since the error handling isn't that complex here, we can do this in a simpler way like this:

First, we’ll get the onShowError and map the received event. Whenever we receive the onNext event, we'll access the emitted SingleButtonAlert value with the $0 and present the error dialog. Next we'll call the subscribe to start listening to the events, and finally, we'll set the disposeBag to dispose the observable. Next, we'll do the same thing for the onShowLoadingHud.
Creating and Updating Friends to the Server
Next we will create a view that we can use to create and update friends to the server. We will also see how to validate the inputs in all of the text fields before activating the submit button. After that, we will check how to bind data back and forth in UITextField, between the view model and the view.
In case you are not familiar with the Friends app, it is an app that you can use to download a list of friends and display them in a table view. You can also add, remove and update friends. I’ve implemented the application using MVVM architecture, and of course, I wrote the backend with swift using Vapor! If you want to learn basic MVVM without RxSwift, check out my old post MVVM pattern with Swift application.
You can get the source codes for the application from GitHub, remember to check out the RxSwift branch. You can, of course, also follow this post without the source code. But now, let’s get down to business!
Add and Edit Friend With RxSwift
So, our goal is to add friend information to the server, and also to update that information. We’ll do that using the same view. 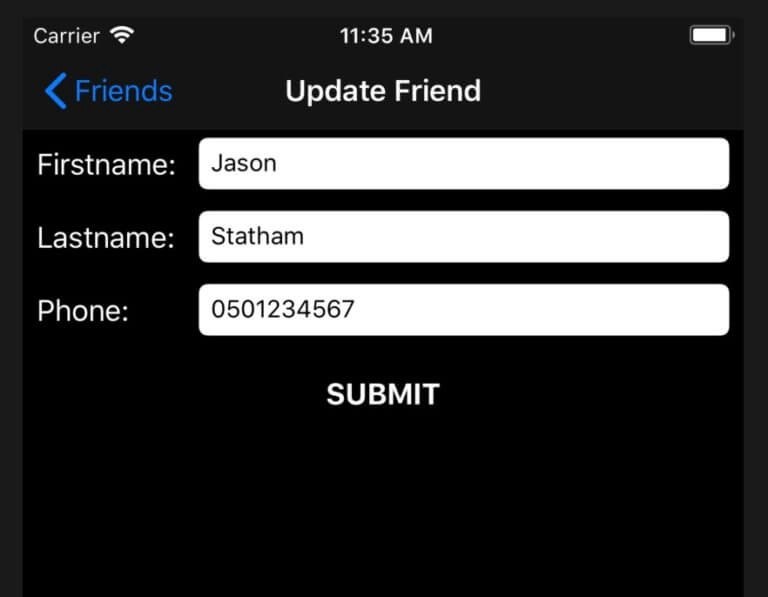
Add and edit friends using RxSwift
We have a view that you can use to enter a friend’s first name, last name and a phone number. First, we define a protocol named FriendViewModel. Then, we will have two view models that conform to that protocol: AddFriendViewModel& UpdateFriendViewModel. In this tutorial, we'll dive into UpdateFriendViewModel. It does all the same things as AddFriendViewModeland fills the text fields with the friend's information when we open the editing view.
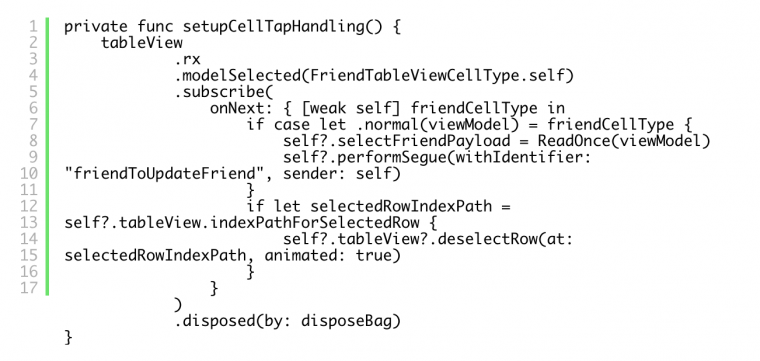
As in the first part with deleting a friend, cell tapping is also set up with a function from the rx extension. Now we use the modelSelected function and subscribe to the events that it emits. First, we'll check that the cell type is normal and bind the viewModel with if case let syntax. Then, we'll store the view model to a new ReadOnce object and perform the wanted segue.
ReadOnce to the rescue
ReadOnce is a helper class that makes sure we are not using an old view model when opening the view:
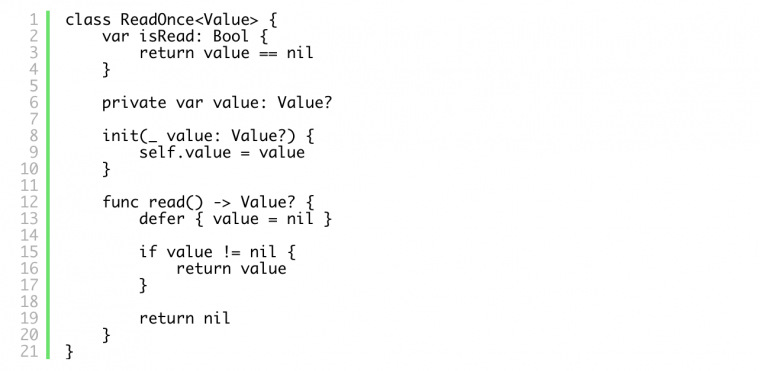
The value is stored in a private var value. You can only access it using the read function. In case you have read it once, isRead is set to false. The next time you call this, it will return a nil value instead. We always create a new ReadOnce object when we are proceeding to a new view, and this makes it a lot safer. Now the chances of an old value messing up the new view creation are very small.
Then, we can check if we should perform the segue. Inside the shouldPerformSegue, we can check the isRead variable. If it returns false, we can proceed.

Now that we know that the segue is performed, we will set the view model in the in prepareForSegue like this:
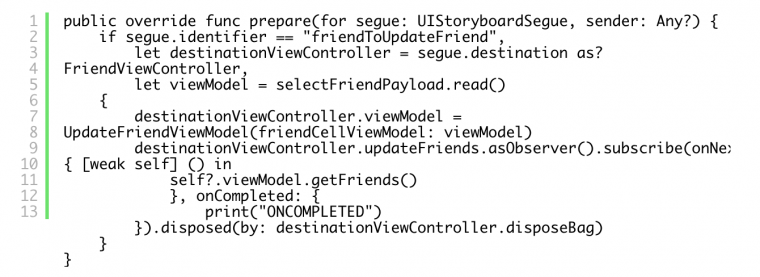
This way, we’ll make sure the view controller is always opened with the correct information.
One interesting thing here is the updateFriends observer. When we are returning back to the friend list after we have updated a friend, we want to make sure our list is up-to-date. That is why we will set up an observer to get an event when we have to update friends from the server. We also want to make sure that this observer is released from the memory. It might be a problem if we have an active observable subscription to a view controller that is released from the memory. We can be sure that we have canceled the subscription when the "ONCOMPLETED" is printed in the console. We'll come back to this issue in the FriendViewController code. I'll show you then how we can prevent the memory issues.
Now we know how to open the view to edit a friend. Next, let’s take a look how to implement UpdateFriendViewModel!
RxSwift Type Definitions in FriendViewModel Protocol
Take a look at the protocol definition below.

All the variable definitions are familiar to us by now, but let’s do a quick recap. We have Variable, Observable and PublishSubject. As we remember, they are all observables. Observable sends OnNext, OnError or OnCompleted to change the state. With Variable, we use the value property to update its value, which is then emitted to the subscriber with an onNext event. Variable is also guaranteed not to emit an error. PublishSubject acts the same as Observable but it can also subscribe to other observables.
I know this was a quick review of the RxSwift observables. In case you want to recap how to subscribe to events etc., please check the first post of the series. Now, let’s move on to the UpdateFriendViewModel to see how we should use all those.
UpdateFriendViewModel Implemented With RxSwift
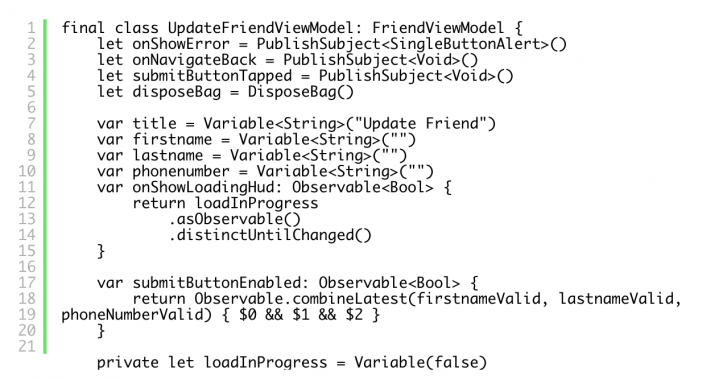
At the top we have PublishSubjects. They emit events to show error and navigate back to the friend list view when users tap the submit button. Below those, we have the good old disposeBag. Then we have all the friends information defined as Variables. We also have the title for the view: "Update Friend". The last two public variables are onShowLoadingHudand submitButtonEnabled.
We want the loadInProgress to be a private variable. This way we can't change the state in the view controller side. Instead, we have defined onShowLoadingHud as a computed property. This is a public observable we can use in the view controller side. It returns the loadInProgress as an observable. We subscribe to this observable in the view controller side and get notified when it changes its state. distinctUntilChanged makes sure the value is only sent once.
SubmitButtonEnabled is a bit more interesting. It combines a few variables and validates the inputs. It then decides if the button should be enabled or not.
Validating Input with RxSwift
To do this, we have to introduce a few more private variables:

We have a computed variable for every input the user can edit. All the variables return the original variable as an observable. For example: we tie firstnameValid with firstname. After the asObservable, we use map and check if the value in the variable is longer than zero characters and return a boolean.
Now, let’s look at the submitButtonEnabled observable again. We can see that it is observing all those private variables we defined. It takes the latest values emitted and combines the boolean values. If all are true, the button is then enabled and the user can update the information to the backend.
The last two variables in the view model are:

AppServerClient is the layer for all the networking in the app. When a user updates a friend's information to the backend, we use appServerClient. We need the last variable friendId to identify the friend that the user is updating.
UpdateFriendViewModel Constructor and SubmitFriend Function
We are almost done with the view model. Next, we will get into the constructor and sending friend information. Let’s start with the constructor:
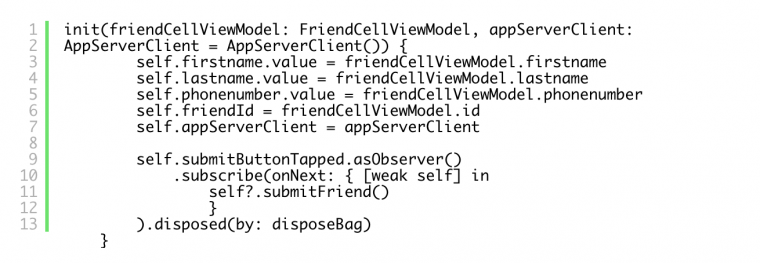
Inside the constructor, we first set all the friend information that we get from the FriendCellViewModel. Then we'll set appServerClient. We want to use dependency injection here to make the class testable. And lastly, we will set up the submitButton. We subscribe to the onNext event and call submitFriendwhen the user clicks the button.
Submit Friend Information to the Server
Submitting friend information is done like this:
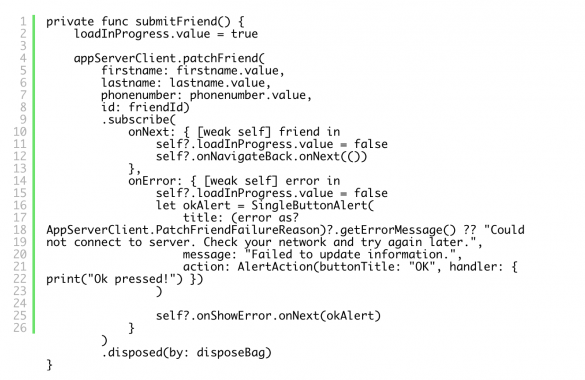
First, we’ll set loadInProgress to true to active the loading indicator. Next, we'll call the patchFriend function from the AppServerClient. It takes the friend information as a parameter and returns an Observable we can subscribe to. When the request is a success, the observable emits an onNextevent. Then we'll hide the loading indicator and emit an onNavigateBackevent. This way, we'll return to the friend list view.
If something went wrong, the observable emits an onError event. We'll hide the loading indicator, and create a SingleButtonAlert with the correct title, message and action. Since the alert is dismissed automatically after button press, the only action here is to print a text in the console to see that the button press works. After that, we'll emit an onNext event for the onShowError to present the alert. One thing you might be wondering here is the getErrorMessage function. At the bottom of the UpdateFriendViewModel, we have defined a private extension for PatchFriendFailureReason. We use it to convert known error messages to text presented to the user:

It checks if the PatchFriendFailureReason enum contains a known value and returns a text we can present in the error popup.
Now we’ll move on to the view controller side!
RxSwift With MVVM FriendViewController
We use FriendViewController to create a new friend and also to update an old one. At the top of the file, we have familiar definitions for UI components and the view model, etc.

Here we also see the updateFriends variable which we already talked about. With that, we'll inform the friend list to update itself. As we discussed, this can lead to memory issues. We want to make sure that we release the observer from the memory when the view controller is released. We can make sure this happens by calling onCompleted for the observer in the viewWillDisapper:

Binding View Model Values
Now, let’s check how we handle the binding between the view model and the controller:
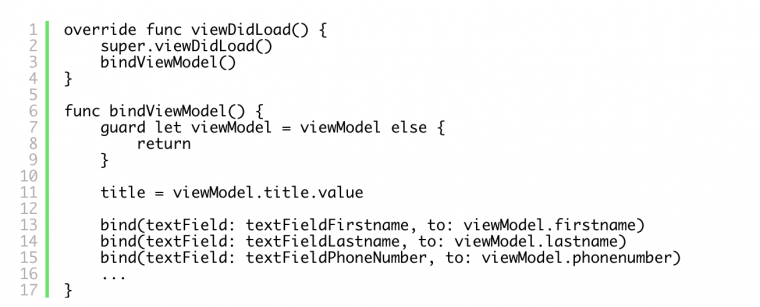
When the view is loaded, we’ll call the bindViewModel function. Inside, we'll make sure we subscribe to all events that change the UI state. Furthermore, we also make sure that we update all values to the view model that the user can change in the UI. First, we'll unwrap the viewModel to get rid of all the optional handling. Down the road, this makes the code a lot cleaner. Next, we'll set the title for the view. title = viewModel.title.value. Then we have a bit more interesting things to do.
Binding UITextField to Variable and Back Again
The text fields and the friend values in the view model need to be bound both ways. When the view controller is opened, we want to fill the text fields in the form with the values from the view model. Also, when the user changes those values, we want to update the new values to the view model. To do this, we make a private function: bind(textField: UITextField, to variable: Variable)

Variable is the variable we have on the view model side. We'll bind that value to the text field by using the text property from the rx extension. This way we always update the text field when we open the view for the first time.
With textField, we'll also use the text variable from the rx extension. Then, we'll use unwrap functions since the text variable is an optional (to make sure it actually contains a value). And finally, we bind it to the view model's variable. We also add both of the parameters to disposeBag to make sure we won't have any memory issues.
This is a lot cleaner solution. It saves us a lot of lines compared to calling those to all text fields and view model variables separately. I really like it, I hope you do, too!
Continuing with the bindViewModel
Next, let’s activate and bind the submit button and the present loading hud and errors to the user.
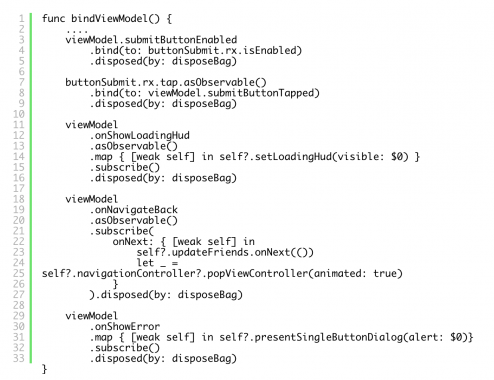
Again, we are using the rx extension. We bind view models submitButtonEnabled to the buttonSubmit and also set a tap handler to the view models submitButtonTapped.
Next, we’ll subscribe to onShowLoadingHud. Again, we use map to get the boolean value from the event that it emits. And call for the setLoadingHud to present or hide the loading hud.

onNavigateBack is pretty straightforward. The only thing we need to remember here is to emit the updateFriends event to update the friend list. With onShowError, we once again use map to get the boolean value. Then we call the presentSingleButtonDialog to display the error.
The rest of the code is just about handling the activation of the text fields. In case you want to know how it is done, please refer to the MVVM with Swift application part 3 and search for activeTextField.
RxSwift and Unit Testing
Next we will talk about Unit Testing. This will take us to the last part of the ‘How to use RxSwift with MVVM’ guide, where we have learned to use RxSwift by implementing the Friends application.
The only remaining thing is to unit test the application. Unit testing of RxSwift applications is pretty similar to unit testing a normal swift application. Once again, the biggest change is that we handle all the callbacks and data updates with observers. In this post, we’ll see how to:
-
Handle Observables and subscribe to events.
-
Mock network layers for unit testing.
-
Handle data validation in unit tests.
All the code that we’ll test is inside view models, so you’ll also learn how to unit test the view model. In case you are not that familiar with the concept of unit testing, I suggest that you read my previous post about unit testing view models. You’ll get all the basic information of unit testing and also a little friendly reminder of why you should always unit test your applications! 😄
Unit Testing RxSwift App
We’ll start by checking how to unit test FriendsTableViewViewModel. It’s a class that handles displaying a list of friends to the user.
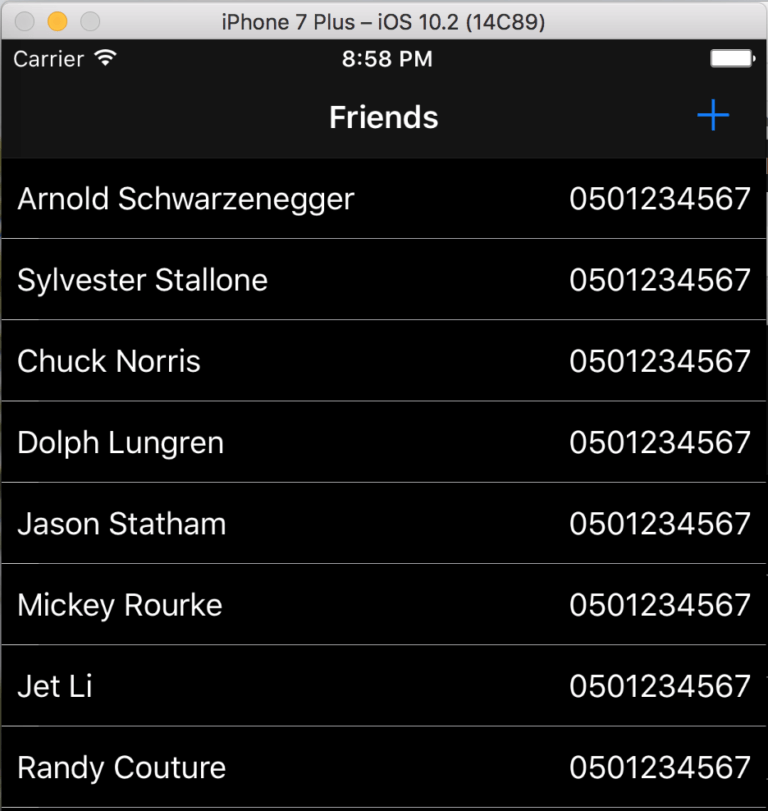
Friends Application
Since FriendsTableViewViewModel makes network requests, the first thing we need to do is to mock the network layer for testing. Generally, we don't want unit tests to make network requests because:
It might take some time to get an answer from the server, which makes running the tests slow. The test might fail because of the network or the server, which makes it impossible to verify the result reliably. By mocking the network layer, we can return a suitable answer for the current test case.
Mocking Network Layers
AppServerClient is the class that handles all the networking in the app. If we open the class, we’ll see that it has a function called getFriends. This is the function that we want to override for the first tests. It downloads a list of friends and then we display the list to the user. The function definition looks like this:

We could define a protocol that has all the same function definitions that AppServerClient has. Then we could make both the AppServerClient and our mock implementation to conform to that protocol. But since we don’t have the protocol already available, we'll use the good old inheritance instead.
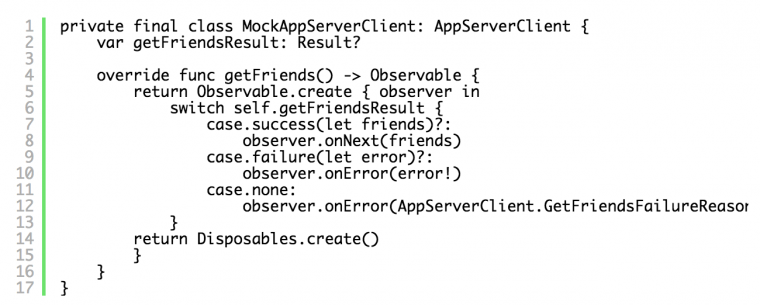
MockAppServerClient inherits from AppServerClient and we have overridden the getFriendsFunction. The first thing we do inside the function, is that we create an Observable that we return from the function. We pass a block for the create function and use Switch for a variable named getFriendsResult.
getFriendsResult is the variable that we use to define the different results for our network requests. In success case, it contains a list of friends and in failure case, it contains an error. Later, we’ll check how to define the value for our tests. Inside the switch statement, we have defined .success & .failurecases and emit .onNext with a list of friends or a .onError with an error value to the subscriber. We have defined the getFriendsResult as an Optional since we don’t want to define an initializer for the mock class. That is why we also need to define the .none case in the function.
And finally, we’ll return a dummy disposable that the Observable.createneeds as a return value. The first step in unit testing an RxSwift app is done! Next, let’s write our first tests. We'll use dependency injection to pass the mock network layer we just created and also set the getFriendsResult to match our test case assertions.
Unit Testing RxSwift — FriendsTableViewModel
When testing the friend list request, we also want to check that our view is in the correct state when the request fails. That is why we’ll write two different tests here. A case when the request is a success and also one that is failing. Actually, there’s also a third state. The server returns an empty list of friends, meaning that our user has no friends. Just kidding, meaning that the user has not uploaded any friend information yet. This case is so similar to getting a list that actually contains friend information, that I’ll leave it for you to figure it out from the code.
But first, let’s take a look at the successful test.
Unit testing RxSwift — Successful friend requests
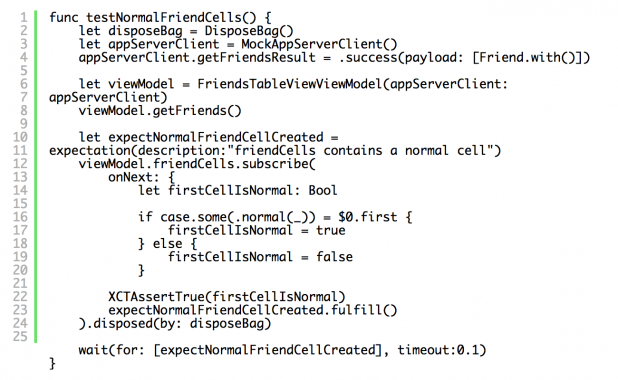
Since we are using RxSwift, the first thing we’ll need to is to create a DisposeBag. Next, we’ll create our MockAppServerClient. Right after creation, we define the getFriendResult to a success and also set the payload to a dummy friend object. Friend.with() is a static function that we have defined only for our testing target which helps us to create a dummy friend:
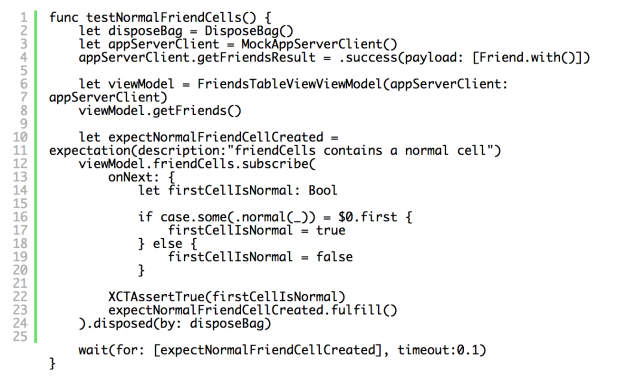
Next, we’ll create the view model that we want to test. When creating it, we’ll give our mock networking client as a parameter. This technique is called dependency injection and it helps us to make our classes testable. In our view models initializer, we have defined the parameter like this:

So, if we don’t give the networking client as a parameter, we use the default version (that actually makes network requests) instead.
Sorry for the somewhat clustered explanation 😅, but let’s continue with the test function code. Next, we’ll call viewModel.getFriends() and make sure that the cells are ready. Now that we have all the things set up, we need to somehow confirm that our view model is in the correct state after we have downloaded a list of friends. This is where the XCTest framework shows its force. We’ll use expectation to create a variable called expectNormalCellCreated. The way that expectations work, is that they need to be fulfilled before a certain time (that we define in our test case) or the test is marked as failed. Here, we expect that in the input data provided, i.e. the first item in the array that friendCellsPublishSubject contains, is indeed a normal cell.
We’ll make sure this is the case by subscribing to the PublishSubject and checking inside the onNext function that the first item is a normal cell. If the item passes that check, we’ll call fulfill for the expectation variable. We use XCTAssertTrue to check the content so that the test fails immediately in case of wrong input. In case our app has a lot of tests, this decreases the time it takes to run them. This way, we don't keep waiting for a failing test case. After the subscribe() call, the last thing we need to do is to add the returned object to the disposeBag.
Phiiuuff, finally we have everything set up. Now we only need to define a time limit in which we need to fulfill the expectation. Again, we’ll use a function from the XCTest framework. wait takes an array of expectations as a parameter (all of these need to be fulfilled) and also a time limit in which those need to be fulfilled. Since the getFriends call in our mock class doesn’t make any network requests, as it is actually synchronous, we can define the timeout to 0.1 seconds.
Now, when we hit the run button, we’ll see that our test is passing. Next, let’s define the failing case!
Unit testing RxSwift — Failing friend requests
Our table view in the friend view displays an error cell when an error occurs. This time, we want to test that friendCells contains an error cell:
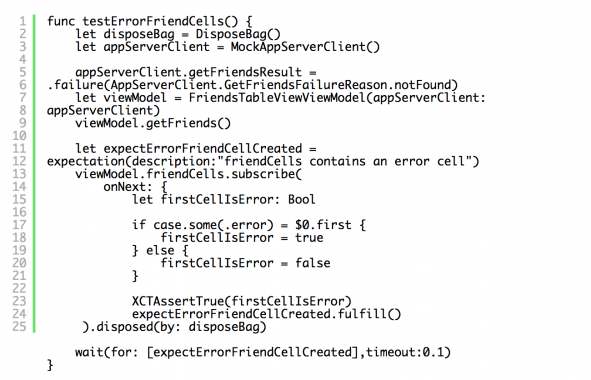
The test case is very similar to the one that we just went through. But this time, the getFriendsResult is defined as a failure. Also, the if-case statement now checks that there indeed is a .error cell inside the array. The rest of the code is identical to the case we just went through, so you can figure it out on your own.
There are a lot more tests inside the FriendsTableViewViewModelTests class but all of them follow the same pattern as defined in these two cases. Check them out and if you have any problems, questions or comments, just DM me on Twitter or comment below and I’ll get back to you :).
Now, let’s check how we can validate the user input data when unit testing an RxSwift app.
Validate input data when unit testing RxSwift apps
FriendViewModel is the type that is responsible for adding and editing friends. FriendViewController is the view that draws the UI. Depending on what we are doing, we’ll either pass AddFriendViewModel or UpdateFriendViewModelwhen opening the view. Both of them conform to the FriendViewModelprotocol. Today, we’ll look into the AddFriendViewModel, which is used to add friend information to the server and see how we can write tests for it.
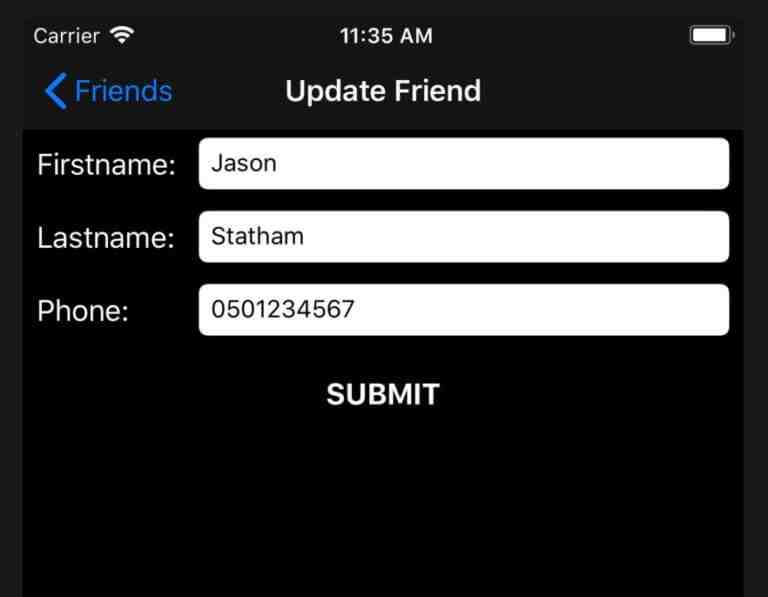
Testing the AddFriendViewModel
To send friend information, all the fields (first name, last name, and phone number) need to be filled. First, we’ll check that field validation is working. We prevent the user from sending invalid information by disabling the submit button unless she has provided valid data. We can test this by subscribing to an Observable named submitButtonEnabled. It emits an event whenever data is changed and we can subscribe to it to check the state. Inside the AddFriendViewModelTests, we have a test called validateInputSuccess which does all this.
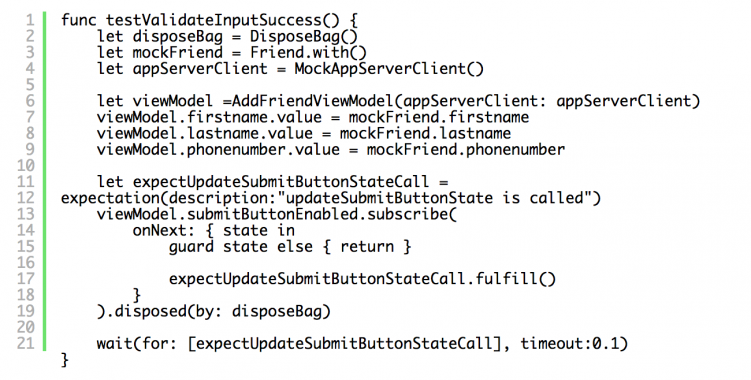
The code looks very familiar. We create disposeBag, mockFriend, and mockAppServerClient variables. Then, we’ll create a viewModel and use dependency injection so that our mock network client is used. The mock network client, defined for AddFriendViewModelTests, is so similar to the one that we just went through, that you can figure it out straight from the code.
Next, we’ll set the data for the user inputs: first name, last name, and phone number. After that, we once again create an expectation, this time for a submit button state change. Then, we subscribe to the event, and fulfill the expectation only after the state emitted is true. In the last line of the test, we use the wait and wait for the expectation to be fulfilled. And that's it! Now we have tested that our data validation is working.
Now let’s check out the last test that we’ll go through. A successful case of adding a new friend.
Unit testing RxSwift — Testing successful friend creation
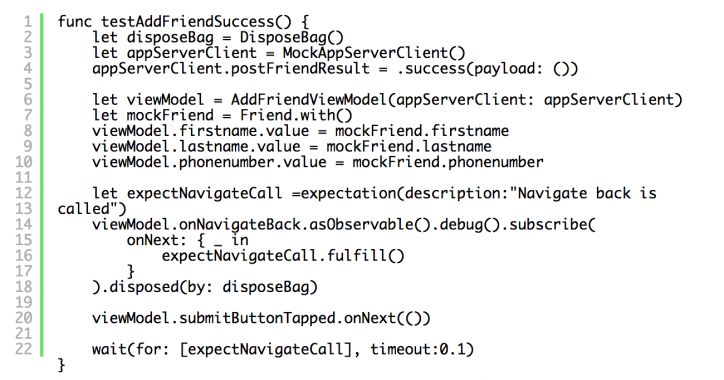
Now, this is a familiar drill to us. DisposeBag, mocking a network, creating a view model, setting the input data and setting up an expectation. After we have successfully created a friend, we’ll navigate back to the friend list view. We know that the navigation is done after the onNavigateBack is emitted. So, to verify that our data is passed to the server, we just make sure the expectation is fulfilled only after the onNavigateBack is called. After that, we’ll call onNext for submitButtonTapped to start sending the information to the server. Normally this is done by the user who pushes the submit button in the UI. If the server response is what we expected, which it will be since we just defined it to be what we want, eventually onNavigateBack is emitted. Now when we run the test, we’ll see that it passes.
You can also find testAddFriendFailure cases in the AddFriendViewModelTests class. We won’t go through that since we already have all the information we need to implement the test. In case there is something that you don’t understand, please ask and I’ll explain it to you.
Conclusion
That is all that I wanted to go through today! We learned how we can test view models when using RxSwift in a project. We also learned how to mock network layers and use dependency injection for our tests. All this is pretty simple after you go through it once, but the first time might be a bit difficult. I hope I was able to help you and I hope to see you here again! Now, thanks for reading and have a great day my friend!


